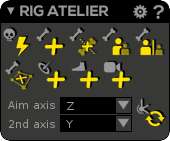
In this window are all the tools for building and modifying your skeleton/IK/Reverse Foot.
...
| Info | ||
|---|---|---|
| ||
All the Rig Atelier commands must be performed into "Bind Pose" or "Build Pose" mode of the Character Bank ( |

| Widget Connector | ||||||
|---|---|---|---|---|---|---|
|
...
| Note | ||
|---|---|---|
| ||
IK or Reverse Foot must be created into the "Bind Pose" or "Build Pose" mode of the Character Bank ( |
| Info | ||
|---|---|---|
| ||
In 3D animation you may animate a skeleton in two ways: forward kinematic and inverse kinematic. Both have their benefits and inconveniences but they need to be used in a complementary way. Forward kinematic (called FK) is a posing technique where each joint is moved, its child bone inheriting its location and rotation. It means that you have to transform your joints, one by one, from parents to childs. For instance: if you want to achieve an arm posing, you have to first position the shoulder, then the arm up to the hand. When there are many joints, this may be fastidious. However, this technique allows to precisely build the posing you want as you interact with each joint. Inverse kinematic (called IK) works the opposite way : you manipulate a target snapped to the last joint of a chain (leaf) and parent joints in that chain are automatically transformed so that the leaf follows the target. In our previous example, achieving an arm posing with IK would only require to position the hand and the other joints up to shoulder would follow. The other main benefit about IK is the ability to lock the target's World coordinates during interpolations. Usually IK/FK workflows requires two separated skeletons: one for IK and one for FK. Meaning you have to keyframe both skeletons and manually blend between them according to the result you seek. It is considered as quite a complicated process... ... but things are very different in Akeytsu! Instead of having two skeletons, we just have one "FK" skeleton. It can be considered as the "default "skeleton and IK may be used directly on it. |
...
| Info | ||
|---|---|---|
| ||
The Reverse Foot is a controller allowing you to work on a human leg and foot with simplicity. Usually, in standard pipelines setting up a Reverse Foot is a complicated technical step but in Akeytsu, you do it like a breeze, in two clicks ! You have to select Father and Leaf joints separated by at least 2 other joints, or more, and click on the Create Reverse Foot button Once created, it mainly does 3 things:
|
...
 Create Reverse Foot: Add an automatic reverse foot to your joint chain.
To create a reverse foot, just select Father (usually thigh) and Leaf (usually ball) joints and hit the command. It automatically sets up a sole/target and 4 locators, positioned by default at their estimated place on the front, back, right and left of the foot skinned mesh. You may need to adjust them by positioning and orienting them so that the roll, twist and bank anchors and rotation directions are perfect.
Exactly like the (standard) IK, the Reverse Foot allows two different behaviors : FK or IK. You switch from IK to FK just by RMB clicking on the sole/target.
FK Behavior:
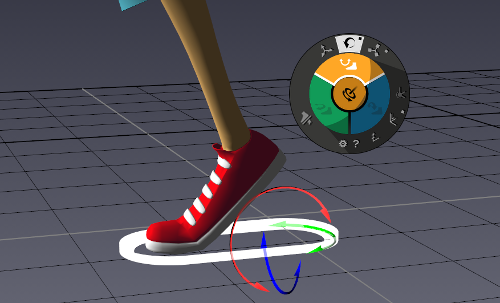
When the sole is white, the FK behavior is on. In this case, moving the hierarchical ancestors of the leg (eg. the root joint) will cause the controller (and consequently the foot) to move alongside, leaving the leg joints relative positions unchanged. By the way you can handle your thigh, knee and ankle joints directly in FK. Useful behavior to move a piece of skeleton and take the controller with it.
...
When the sole is red, the IK behavior is on. In this case, moving the hierarchical ancestors of the leg (eg. the root joint) will forbid motion on the controller, anchoring its position in the 3D world, and consistently placing and orienting the leg and foot. Useful behavior to handle contacts on the ground or on a precise point of the 3D world.
...
| Note | ||
|---|---|---|
| ||
|
| Note | ||
|---|---|---|
| ||
As a rule, Reverse Foot visual feedback is only guaranteed to be correct when a layer is displayed on its own (e.g. at full opacity and all other layers at 0 opacity or hidden). |
...
| Anchor | ||||
|---|---|---|---|---|
|
Camera (Beta)

 This button allows you to create a new camera from the actual perspective viewpoint.
...