How to use the Copy/Paste Skin feature
First, keep in mind that this feature works only between different skinned meshes, so you can’t copy/paste weights on the same skinned mesh (excepted if you copy one vertex only).
Furthermore, your meshes must be previously bound (even on one joint only) to accept weight pasting.
A joint or a character must be selected to allow vertex selection
Please select first a joint of your character — or even the character itself — to allow vertex selection on the corresponding skinned mesh(es). If you select directly the skinned mesh (into the Tree) you won't have the ability to select its vertices…
Prefer the Full Vertex Select Mode
For your Copy/Paste actions, we recommend to work with Full Vertex Select mode activated ( ). This way, you will be sure to select and work on all displayed vertices.
Copy a skinning to a « different » character
- Open the *.akt file containing your source character and import the target one.
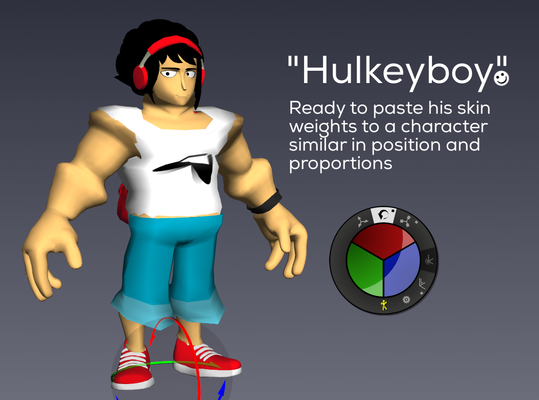
- In Check Pose, play with your joints (Move/Rot/scale) to position/handle your source model skeleton to fit as well as possible your target model (position and proportions). It can lead to fun results (as the bodybuilder Akeyboy below ;-))!
- When the 2 models look « quite similar » now you are ready to copy/paste skin (as mentioned above, keep in mind your new mesh must be previously bound to receive weight pasting).
- In the Tree, select the source character or one of its joints: it allows limiting vertex selection to the selected character.
- Select the vertices you want to copy weights from and hit « Copy Weights » in the Skin Atelier. The copied vertices turn blue.
- Now select the target character or one of its joint and select all the target vertices you want to paste weight on. At this moment, copied vertices (blue) and target vertices are displayed together.
- Hit « Paste Weights » in the Skin Atelier. If skeletons do not match an « influence matching window » will appear to allow matching source influences with target ones. That’s it !
Copy a skinning to an updated mesh (geometry modifications on your current character)
- Open the *.akt file containing your source character and duplicate it. Import your new mesh in the scene.
- Delete the skinned mesh of the duplicated character and bind the new mesh to one joint or to the full skeleton (no matter).
- Obviously, source and target model are already similar, so no need to position your source model to fit the target one.
- In the Tree, select the source character or one of its joints: it allows limiting vertex selection to the selected character.
- Select the vertices you want to copy weights from and hit « Copy Weights » in the Skin Atelier. The copied vertices turn blue.
- Now select the target character or one of its joint and select all the target vertices you want to paste weight on. At this moment, copied vertices (blue) and target vertices are displayed together.
- Hit « Paste Weights » in the Skin Atelier. That’s it !
Copy a skinning to additional parts (such as props or clothes)
- Open the *.akt file containing your character.
- Import your new mesh(es) in the scene and bind it (them) roughly to your character. Please notice that the additional meshes should be modeled to fit the source model.
- Select the vertices you want to copy weight from and hit « Copy Weights » in the Skin Atelier. The copied vertices turn blue.
- Select all the target vertices you want to paste weight on. At this moment, copied vertices (blue) and target vertices are displayed together.
- Hit « Paste Weights » in the Skin Atelier. That's it!
Tips