
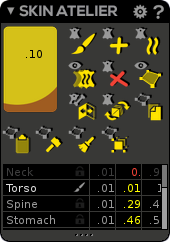
The Skin Atelier is meant to manage skinning weights, meaning by that: Bind, Edit and Mirror your skinning weights.
...
| Info | ||
|---|---|---|
| ||
All skinning operations must be performed into the "Paint & Check" mode of the Character Bank ( |

| Info | ||
|---|---|---|
| ||
In Rigging/skinning mode, the Shift button (eventually combined with Ctrl and Alt) is a very important key as it allows you to grab your vertices using pick/rectangle selection (LMB) or using lasso selection (MMB). More details about the vertex selection lower in this page. |
...
The Duo Skin process is our new automatic skin workflow developed to provide (far) better and quicker results.
This process is called « Duo Skin » as it is split in 2 different steps:
- During the 1st step Akeytsu will bind in rigid your mesh(es) to your skeleton
- Then (2nd step), Akeytsu will perform smoothing over 1st step influences
| Info | ||
|---|---|---|
| ||
Since we use Geodesic Voxels during the 1st step, the skinning should already looks good enough. Experts may still want to tweak and adjust some areas by going back and forth between 1st (rigid) and 2nd steps using the Duo Skin Mode button. |
...
- First of all, use Ctrl+Left Click to gather both desired mesh(es) + desired joint(s). To select the character, go in the Tree window, to select joint(s), it's often easier to parse the picker window (instead of expanding the whole tree hierarchy),
- hit the Bind Skin command. It will (pre)bind in rigid your selected mesh(es) to your selected joints and then automatically perform a smoothing straight afterwards. From that moment, you already get your smoothed skin.
- If you are pleased with the result you can stop here!
- If you want to adjust your skinning, you have got two solutions:
- Easy & Quick: go back into the Rigid step (by using the Duo Skin Mode button), manually refine your rigid skinning zones (using rigid tools only) and hit the Process Smooth Skin button to perform a new auto-smooth pass.You can then iterate the process on the full skinning or on specific parts as well as setup each joint smoothing strength in front of each one in the Picker window
- Longer: stay into the Smooth step and manually refine your smooth skinning zones (using smooth tools)
Now discover the features more in details!
| Warning |
|---|
The following video not yet up-to-date and still describes the previous way to use Duo Skin. We plan to update it as soon as possible. Thanks for your understanding. |
Widget Connector width 480 url https://www.youtube.com/watch?v=PPbGEv55ebE height 270
 Skin Painter (Shortcut: A): Enable/disable the Painter window toolset
 Bind Skin: Bind in rigid the selected meshes to the selected joints and auto-smooth the whole influences straight forward.
 Process Smooth Skin: Generate smooth (end) skin from rigid (start) skin according to your joint selection (and potentially vertex selection) as well as the smooth factors displayed into the Picker (once the skin is pre-bound).
| Tip | ||
|---|---|---|
| ||
For this kind of characters, you need to turn "off" the smooth factors - by clicking on the smooth factor icon into the Picker - on all joints before launching the smooth/bind process. Then it will bind/finalize your skinning without smoothing it! |
 Duo Skin Mode: Display and edit either rigid (start) or smooth (end) skin.
| Note | ||
|---|---|---|
| ||
Please note that in 1st step (Rigid mode) of the Duo Skin Mode, your skinning is just a "pre-skinning" (a kind of blueprint). Since then, it's not allowed to smooth influences so only "rigid" tools are available. |
 Unbind Skin: Unbind the current skinning, meaning that your skinned mesh(es) return(s) to mesh(es) state. By the way, another method to unbind your skinning is to drag'n'drop your skinned mesh(es) outside the Character node into the Tree window.
 Hide Skinned Mesh Vertices: Hide the faces corresponding to the selected vertices. Very useful to skin from the inside of the model or to hide the empty side when you work on your half skinning.
| Tip | ||
|---|---|---|
| ||
Once you already hide vertices and in case you make a new selection of vertices, you will notice a little "+" sign appears into the command. At that time, if you hit the command again, this new selection of vertices will be added to hidden vertices. Quick, simple & efficient! |
| Anchor | ||||
|---|---|---|---|---|
|
 Mirror Skin Weights & Joints: Mirror the skinning weights and the joints in same time. Please notice that the mirroring process works according the YZ plane and the (side) joints must have the following tags in their names : r_/l_/R_/L_ as prefix, or _r/_l/_R/_L as suffix or even right/left/Right/Left anywhere in the name. Then select the side you want to mirror and hit the command. If the joints already exist on the other side, only weights will be mirrored.
Widget Connector width 480 url https://www.youtube.com/watch?v=yprTYHo_ZGo height 270
| Tip | ||
|---|---|---|
| ||
If you go into Bind (or Build) Pose, you will notice that the Mirror command remains enabled and allows to mirror joints only. It displays a slightely different icon |

...
| Anchor | ||||
|---|---|---|---|---|
|
 Update Skinned Mesh: Allows you to quickly replace the existing skinned mesh by an unbound (new) one. The tool will smartly transfer all weights to the new model and remove the old mesh. If you want to keep your old mesh, you need to duplicate it and select only one of your two copied meshes, then your new un-skinned model and finally execute this command
| Info | ||
|---|---|---|
| ||
This feature is especially useful if you want to update your model topology, UV Coordinates, Vertex colors, Materials, and/or Textures. This is a simplification of the copy/paste feature |
| Info | ||
|---|---|---|
| ||
Before updating your meshes, please always check that your mesh transformation values are set to 0,0,0. That will prevent any potential coming issues (in Akeytsu, export warning or issues on export, etc.). You can use the "Reset'n'Freeze" feature available in the Transform window to reset your values. |
| Note | ||
|---|---|---|
| ||
As, internally, Akeytsu doesn't delete duplicated textures (which can lead to quickly increase your file size), we recommend that the new meshes don't have media imported with. |
| Tip | ||
|---|---|---|
| ||
|
 Copy Weights: Copy weights values of the selected vertices.
| Note | ||
|---|---|---|
| ||
|
| Note | ||
|---|---|---|
| ||
For your Copy/Paste actions we recommend to work with Full Vertex Select mode activated ( |

...
| Widget Connector | ||||||
|---|---|---|---|---|---|---|
|
 Fix Weights: Average weights on the selected vertices according to neighbour vertices.
 Sweep Weights: Clean very small weights on the selected vertices. The threshold is available into the Skin Atelier preferences.
 Full Select Mode: If enabled, this mode allows to select front and back vertices using pick/rectangle mode and lasso. By default this mode is disabled, providing a classic paint mode, meaning front vertices only.
...