
The Stacker is our special keyframe manager, inspired by traditional animation X-Sheet (which is by far the best tool to manage keyframes). It works in a complementary way with the TimeBar.
Replicating exactly an X-Sheet would not have been pertinent as 3D environment has its own needs and constraints. That is why we imagined something different, something that would mix the "best of the two worlds" (2D and 3D).
Stacker designation
Stacker rule
In the Stacker keyframes and timings are linked (timing between the previous keyframe and the current one). It means that:
- If you add a keyframe, you add time, therefore next keys are shifted further.
- If you delete a keyframe, you delete time and next keys are shifted back. The same rules apply if you edit a keyframe's timing.
Keyframes
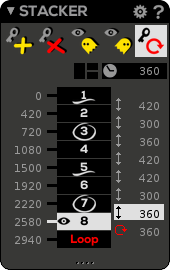
Inside the Stacker, a keyframe looks like this: 
- Keyframes are displayed in the center, listed vertically and numbered.
- Keyframes have their time position (global time) on the left side. You may edit this time by LMB double-clicking on it.
- Keyframes have timing between keyframes on the right side. You may edit this time by LMB double-clicking on it.
- keyframes can be moved by drag'n'drop.
- If you press Ctrl button during the drag'n'drop it duplicates the selected keyframes
- Keyframes can be flagged as "Extreme" or "Breakdown" by RMB click menu.
Extreme and breakdown keys
Extreme ( ) and Breakdown (
 ) flags are only visual feedback. It helps you to clearly visualize and distinguish your keyframes.
In traditional animation, an "extreme" pose (also called a "key") represents a "key" moment in an animated sequence. It is the highest level of pose. A "breakdown" (or "passing/middle" pose) is a "main inbetween" pose between extremes.
Keyframe RMB Menu
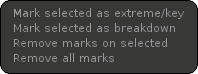
By RMB clicking on a keyframe you open the Keyframe Menu:
- Mark the selected keyframes as "extreme" ().
- Mark the selected keyframes as "breakdown" ().
- Remove marks from selected keyframes.
- Remove all marks.
Stacker features
 Create Key: Add a key after the current keyframe with a default timing. After creation, the new key is automatically selected.
Two different "create key" features
- If your time cursor is already on a keyframe, you will create a new key the way described above (current key duplication, current key timing).
- If your time cursor is between keyframes, you will create a new key (inbetween key) being the interpolation of the two keyframes without shifting next keys. However all keys will be renumbered.
 Delete Key: Remove the current keyframe(s) selection and its timing.
 Display Prev. Ghost: Show previous key or frame of the Stacker as ghost.
 Display Next Ghost: Show next key or frame of the Stacker as ghost.
 Loop Mode: Insert an automatic loop key to simplify cycle animation workflow. The loop key is positioned at the end of the animation and can't be edited as it always mimics the first key (even if it is modified afterward) (
 ).
).
Animation curves "pre" and "post" loop mode are automatically modified.
 Quick Select Keys: Select all, first half or second half of keyframes.
 Timings amount: This field displays the total time amount for the currently selected keyframes. When you edit it, selected keyframes' timings will be scaled to match the value you entered (as best as possible).
Audio Stacker
The Stacker is also used to manage Audio Clips
To create an audio layer, you will need to go in the mixer window and use the "Create Audio Layer" button
Supported audio file format
Currently, Akeytsu can support .mp3 .ogg and .wav file formats, more formats may be supported in future releases
 Add Audio Clip : Open the explorer so you can pick an audio file.
 Delete Audio Clip : Removes the current audio clip(s) selection and its timing. If you delete the last audio clip in the stacker/timebar, the audio layer will be removed as well
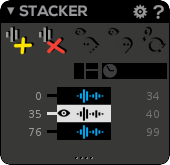
Inside the Stacker, audio clips looks like this:

- audio clips are displayed in the center, listed vertically.
- audio clips have their time position (global time) on the left side. You may edit this time by LMB double-clicking on it.
- audio clips length are displayed on the right side. You cannot edit this time since we do not allow to extend/compress a clip timing yet.
- audio clips can be moved by drag'n'drop.
- If you press Ctrl button during the drag'n'drop it duplicates the selected clips
Stacker Preferences
You can find here settings about onion ghosts.
Ghosts on playing: If checked, ghosts will be displayed during playback.
Ghosts always wire: If checked, ghosts will be always rendered in wireframe. It can help visibility.
Prev. ghosts: Set the number of displayed previous ghosts.
Next ghosts: Set the number of displayed next ghosts.
Ghosts on: Choose to display ghosts on keyframes or frames.