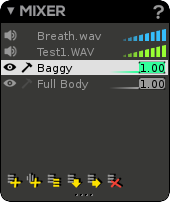
Mixer Window
The Mixer is the animation layer manager for your current animation.
The Mixer is also the place where you will be able to generate Audio Layers, which will contain one or more audio clips
The Layers are mixed from bottom to top. Meaning that a layer above will overwrite a layer below.
Layer designation
Layer selection and different informations
The Mixer is the only place to select your different Layers. You can not manipulate keyframes of an unselected Layer in the Timebar. You need to select it first in the Mixer.
Selecting a Layer in the Mixer:
- Will display its keyframes in the Layer Window.
- Will display its keyframes in the Timebar.
- Will display its controllers in the Picker Window.
- Will display the activated channels of its controllers into the Transform window (an activated channel is a channel that will be keyframed)
The Layer as animation layer (content)
A Layer (or animation layer) is a selection set of keyframable controllers (controllers available for the moment: joints, IK controllers and RF controllers). You may only work on one layer at a time.
Layer keyframing rule
In the Mixer window, a Layer looks like this
Still In the Mixer, audio Layer looks like so :
Layer Visibility: Show or hide the Layer (and its result on the animation.
Layer Edit Mode: Activate the Layer Edit Mode to add or remove controllers (in the Picker window) and/or controller channels (in the Transform window). Once entered into the Edit mode, the Picker window displays hammer icons in front of the key framed controllers and the Transform window displays hammer icons in front of the key framed channels.
Audio Layer Sound: Mute/Unmute the current audio layer
About IK and Reverse Foot chains
IK and Reverse Foot (RF) chains must be “complete” meaning that IK or RF targets can not be alone in a Layer or without all the joints of their respective chain. So if you remove a joint of a chain it will automatically remove the respective IK or RF controller. However, it won't remove the other chain joints.
Layer Name: Here you can rename your Layer by double-clicking on it
Layer Opacity: You can modify your Layer opacity from 0 to 1 by sliding the box.
Audio Layer Volume intensity : Allows you to fine tune the sound volume of your audio Layer by sliding over the whole icon
Animation layer blending mode
Akeytsu now supports Override blending and Additive mode. In order to switch between both modes, simply right-click on the layer you want to affect, and click on the available mode : if you're in override, then additive will be there, and vice-versa.
Mixer Features
Create Layer: Add a new Layer composed of the selected controllers with a default keyframe (time 0). When you create a Layer, its Edit mode is enabled: it means that you can add/remove channels and controllers by checking/unchecking the corresponding “hammer” icons in the Picker and Transform windows. Please notice that a created Layer will remain in Edit Mode (hammer icon) until you disable it.
New Space Switch Process
Space Switch Layers do not exist anymore. Meaning from now on you do not have to deal with syncing MRS and SpaceSwitch keys. Space Switch feature is now directly handled into current MRS Stackers using only the dedicated field into the Transform dialog. This feature allows you to dynamically handle your props, meaning by that giving you the ability to change the space of a joint or an IK target at a specific time. You can find the space switch working process on the following page Space Switch Process.
Create Audio Layer: Open the explorer and allows you to pick up an audio file. Then Akeytsu will create a new audio layer. This new layer will have the name of your audio file, so you can easily see which layer holds which sound.
Duplicate Layer: Add a copy of the current Layer with all controllers, keyframes and color. Name is incremented.
Merge Layers: Merge together the selected Layers. If you select only one layer, it will merge with the below one. In case you select several Layers, the remaining Layer will be the last one selected. When you merge layers with opacity <1, the result Layer will have opacity = 1 but preserving the visual result of blended Layers.
Extract Layer: Generate a new Layer composed of selected (extracted) controllers from the current one. Keyframes are extracted too.
Extract alternative feature
About IK and Reverse Foot chains
As evoked previously : IK and RF chains must be “complete”. So, if you select a joint of a chain in order to create a new Layer to extract (or to Ctrl-extract) a Layer, it will involve all the joints of the chain (plus the target).
Delete Layer: Delete the selected Layers.


