Preferences
- Aurélien Charrier
- Etienne Beschet
UI Scaling
Please note that if you are on Windows 10 and on a big resolution, your UI scaling may need to be set-up to the following in order to run Akeytsu in the best conditions :
Scaling at 100% or 125% for 2560*1440px (2K WQHD) > which is the most comfortable one
Scaling from 150% to 225% for 3840*2160px (4K) > which looks similar to Full HD
You can access the Preferences window at the bottom of the Viewport & Settings Menu or via the cogwheel icons of the different Akeytsu dialogs.
3D Rendering Preferences :
- BackFace Cull : If enabled, faces will be displayed as one-sided instead of two-sided, and all inverted faces won't be shown anymore.
Anim Bank preferences (you can access these settings directly in the Anim Bank window):
- Window resizement : Here you can decide if you want to enlarge the window when hovering it or always (frozen), useful for very long names
- Skip retargeting ref pose advice popup : Let you decide if you no longer wants to be prompted about making a convenient reference pose for retargeting characters to one another
Autorigger preferences (you can access these settings directly in the Autorigger window):
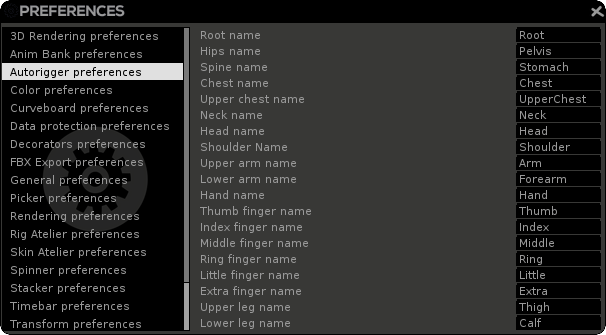
- Allows you to define each names of body parts generated by the autorigger
Color Preferences :
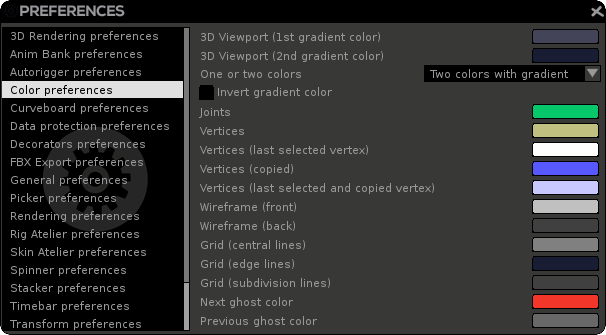
- 3D Viewport (1st gradient color) : pick the main color (if you're in single color mode). This is also the Top gradient color
- 3D Viewport (2nd gradient color) : pick the secondary/bottom gradient color (only visible if you're in Two colors with gradient mode)
- One or two colors : Choose if you want a flat color or a gradient based on two distinct colors
- Invert gradient color: allows you to flip your colors
- Joints : Allows you to change joints color
- Vertices : Changes the displayed vertices color
- Vertices (last selected vertex) : Changes the very last selected vertex color, this vertex is also displayed in the skin Atelier in the central column
- Wireframe (front) : Changes the color of the front wireframe
- Wireframe (back) : Changes the color of the back wireframe (active if backface culling is disabled)
- Grid (central lines) : Changes the color of the central lines
- Grid (edges lines) : Changes the color of the borders of the grid
- Grid (subdivision lines) : Changes the color of all the intermediary lines
- Next ghost : Changes the color of the next ghost(s)
- Previous ghost : Changes the color of the previous ghost(s)
In this specific submenu, you will see plenty color tones. Each of these will change a specific aspects of the UI/Viewport/Decorators. (We do not allow yet to color everything).
To change a color, simply click on the color, which will bring this colorpicker :
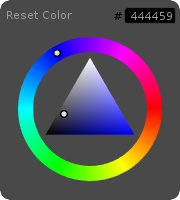
In this colorpicker :
- click on the wheel : changes the HUE/tint
- click on the triangle : adjusts the Saturation/Value
- hold and drag your Left click on the Wheel/Triangle : changes respectively Hue and Saturation/Value parameters in realtime
- Reset Color : resets the current color to its default setting
- Number Field : Allows you to bring an external color using its Hexadecimal code, most apps which manages colors have this feature. You can also copy the actual color and paste it anywhere you want
Curveboard :
- All Curves Ahead : Brings all curves in front of the viewport instead of leaving only unused curves in the background
Data protection preferences :
- Send software analytics to improve software engineering: If enabled, you'll regularly send us useful data about how you technically use Akeytsu, no 3D files or any personnal information is sent
- Send crash reports for troubleshooting : If enabled, then you'll automatically send us your crash files, which will be helpful to track and resolve bugs
- Read privacy policy online : Brings you to "Nukeygara Privacy Policy" (https://www.nukeygara.com/legal/privacy-policy)
Decorators preferences :
- Decorators display affects all views : If enabled, you will see your skeleton/pivots/and shading mode (wire/shaded/wire+shaded) shared across all view
- Skin decorator alpha : Changes the opacity of the skinning influences
- Blendshape picking decorator alpha : Changes the opacity of the Blendshape picking zone
- Joint Display mode : Light is the new mode implemented by Nukeygara, it allows to have a much lighter display of joints, and also offers to switch between joint display and joints pivots only modes (spheres only). Classic is the legacy joint display of Akeytsu
Joint size factor (standard density area) : Allow to resize the joints of the current scene.
- Joint size factor (high density area) - Light mode only : Allows you to change the adaptive size of joints on very dense areas (like hands, face) when in Light display mode
Pivot size factor: Allows to resize the pivots of the current selection.
Pivot size factor (unselected joints): Allows to resize all unselected pivots.
Scene setting
The size factor of joints and pivots are saved into the scene.
General preferences:
- Rotate and zoom view around selection: If checked you benefit from an automatic rotate and zoom view mode around your joint selection.
- Skip welcome window at startup: If checked, the welcome window will not appear at akeytsu's startup.
- Do not show update window until next update : discard update popup until you manually install the next update of akeytsu
- Automatically check for updates at startup: If checked, akeytsu will check for updates at startup. We recommend to let this option checked.
- Autosaving files every 10 minutes: If checked, akeytsu will save a back up version of your current files every 10 minutes in the folder Users \ ... \ Documents \ akeytsu \ Autosave.
- Undo/redo max actions count: Set the desired maximum number of Undo/Redo
- Reverse RMB Zoom View : Allows you to reverse the zoom default behavior
- Suppr button delete keyframe in Animation mode: If checked, then akeytsu will handle delete accordingly to the current rig/anim mode. In Rig, it will delete tree objects (character, joint, camera, IK...etc), in Animation, it will delete keyframes
- Deselect by single click in empty space: if checked, then you will be able to clear current selection by LMB clicking in empty space (unpickable area works too)
Rendering preferences:
- Rendering quality vs performances (requires restart): offers you to switch between 3 modes so you can better fit to your PC specs. Relies on anti-aliasing samples (Fast=0, Balanced=4, Beautiful=8)
Mac rendering options
This setting will be implemented on macOS in a future update
Rig Atelier preferences (you can access these settings directly by clicking on the wheel in the upper right corner of the Rig Atelier window) :
- Auto-orient on creation: Automatically orient your joints at creation, according to "aim" and "2nd" settings above.
- Joint snap YZ plane pixel threshold (ortho views): Allow to adjust the precision of YZ plane snap feature. Entering "0" will turn off this feature. When grid is active This also affects distance from which hotpoints/joints will snap to the YZ plane in build/bind pose
- Size factor: Allow to resize the IK and Reverse Foot targets of the current scene.
Scene setting
The size factor of the IK and Reverse Foot targets is saved into the scene.
- RF bank angle max value: Maximum angle values allowed concerning foot bank (scene setting).
- RF twist angle max value: Maximum angle values allowed concerning foot twist (scene setting).
- RF roll backward angle max value: Maximum angle value concerning foot roll on the heel (scene setting).
- RF roll angle bending limit value: Maximum angle value concerning foot roll on the ball, without taking off the ball (scene setting).
- RF roll angle unbending limit value: Angle value concerning foot roll on the ball, from ball take off up to straight foot (scene setting).
- RF roll forward angle max value: Maximum angle value concerning foot roll on the toe (scene setting).
- RF zero value snap threshold (Roll, Bank, Twist): Angle under which the foot snaps to 0 value (scene setting).
Skin Atelier preferences (you can access these settings directly in the Skin Atelier window):
- Activate/Deactivate Weight step : Enable or disable a "step" (or snap") when you move the weight slider on the Weight Ramp, this is a Skin Atelier window preference
- Weight step value: define the step value of the Weight Ramp, this is a Skin Atelier window preference
- Activate/Deactivate Strength step: Enable or disable a "step" (or snap") when you move the strength slider, this is a Painter window preference
- Strength step value : define the step value of the strength slider, this is a Painter window preference
- Sweep Weights value below: Weight value threshold used by the "Sweep Weights" command, this is a Skin Atelier window preference
- Hide 3D manipulators if skin painter turned on: If enabled, this feature will hide the 3D gizmos while skin painting stage.
- Allow to mirror weights on different skinned meshes: If enabled, even if the source point and the target point of the mirror do not belong to the same mesh, the algorithm still mirrors the source point at the target point.
- Rigid skinning algorithm : Allows you to switch between Joint proximity (Legacy method) and Geodesic voxel (New method, which is more accurate in most cases than the Joint proximity method, but takes a bit longer to process)
- Voxel precision : Allows you to change the Geodesic voxel grid subdivision in order to adapt to your model's details. There are 3 modes : Rough (fast), Balanced, and Accurate (precise)
- Max inf.pr vtx: The Duo Skin algorithm and the Skin Painter algorithm will associate at maximum to each vertices the number of joint specified. Min = 1 joint influence ; Max = 8 joints influences
- Low smooth strength (recommended for face): Strengh associated to the joint tagged as low in the picker. The strengh modifies the smoothing of the skinning. This is a Duo Skin preference.
- High smooth strength (recommended for body): Strengh associated to the joint tagged as high in the picker. The strengh modifies the smoothing of the skinning. This is a Duo Skin preference.
- Negligible inf: The weight below this value will be erased with the Duo Dkin algorithm and the Skin Painter algorithm.
Spinner preferences (you can access these settings directly in the Spinner):
- Discrete move step value: Set the step value for each move transformation incrementation.
- Discrete rotate step value: Set the step value for each rotate transformation incrementation.
- Discrete scale step value: Set the step value for each scale transformation incrementation.
- Toon scale Coefficient: Set the scale coefficient for the toon effect (same coefficient for the 3 axis).
- Show axis hints: This option extends infinitely axis of the selected object allowing to position and orient it easily according to another object.
- Use Move 3D gizmo in Spinner rotate mode: This option allows to let the Spinner in Rotate mode while handling the Move transformations directly with the 3D Gizmo. This manipulator combo is particularly efficient!
- Synchronize the move and rotate modes coordinate system: Allows you to sync the space (Local, world, Screen) between Move/rotate gizmos
Stacker preferences (you can access these settings directly in the Stacker window):
- Ghosts on playing: If checked, ghosts will be displayed during playback.
- Ghosts always wire: If checked, ghosts will be always rendered in wireframe. It can help visibility.
- Prev. ghosts: Set the number of displayed previous ghosts.
- Next ghosts: Set the number of displayed next ghosts.
- Ghosts on: Choose to display ghosts on keyframes or frames.
Timebar preferences (you can access these settings directly in the Timebar):
- Unified Timelines: If checked, the timeline won't move if you switch from a character/animation to another. It's recommended in case of multi-character interaction (i.e. : for cinematics)
- Displayed stacks: Set the maximum number of displayed stackers into the Timebar.
- Time unit: Choose your working time unit.
- Scene Frame Rate: Choose your scene framerate.
- Play speed : Edits the playback speed, useful to see details and refine your animation
Audio playback scrub length: the duration (in milliseconds) of the played sound when you change timeline position while animation isn't playing.
Transform preferences (you can access these settings directly in the Transform window):
- Copy/Paste IK target color: Copy and paste the IK and Reverse Foot target color (so the interpolation mode related to the target).
- Mirror IK target color: Mirror the IK and Reverse Foot target color (so the interpolation mode related to the target).
Tree preferences (you can access these settings directly in the Tree):
- Tree resizement on hovering: Set the width coefficient (X2, X3, etc.) of the Tree window when you move your mouse cursor above it.
Unit and grid preferences:
- Size unit: It represents your distance unit among millimeter, centimeter, decimeter, meter, inch, foot and yard.
- Grid size: It represents the number of units of the lenght and width of your grid.
- Unit subdivisions: It represents the number of subdivisions per unit.
Scene setting
The unit and grid settings are saved into the scene.